The Urban Farmer, Issue #014
July, 2009:
Spotlight on Lighting * What are Light Movers? * Dear Simon: Grow Up?

“Science, or para-science, tells us that geraniums bloom better if they
are spoken to. But a kind word every now and then is really quite enough. Too
much attention, like too much feeding, and weeding and hoeing, inhibits and
embarrasses them.”
~Victoria Glendinning
A Primer on Hydroponic Lighting
The most ideal light for your hydroponics garden, of course, is sunlight. So
far, no artificial lighting can truly match the quality or quantity of light
produced by the sun. So outdoors is truly the best.
But, an outdoor hydroponics garden, while definitely doable (uncovered porch or
courtyard), takes away some of the best advantages of the hydro method:
- Isolated from bugs and diseases
- No access to outdoor space
- Protection from extremes in weather
(torrential storms, freezes, high winds)
So what do we do? We compromise! We hang
special lamps above our indoor hydroponic gardens to provide the best possible
artificial lighting for those crops.
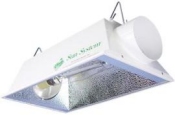
Types of Lights
In the earlier days of hydroponics, fluorescent lighting was about as good as
you could get. “Gro lights” or “Gro Lux” lamps were available which provided
high intensity cool-white fluorescent light. Fluorescent lights burn very cool
and are still fine for non-fruiting, non-flowering specimens. We use T5
fluorescents (latest generation) exclusively for our lettuce rafts, with great
success.
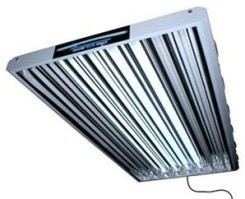
T5 fluorescent lamp
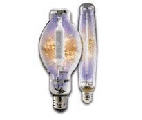
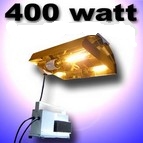
Today, plant lights are much more sophisticated and closer to the spectrum and
intensity of sunlight. Most lights sold for hydroponic gardening are high
intensity discharge (HID) lamps. Further, there are two types of HID lights:
high-pressure sodium (HPS) and metal halide (MH). The best lighting is a combination
of HPS & MH, each one used at different times in the growth cycle.
HPS lights provide more of the red-spectrum
rays, which promotes fruiting and blooming. MH lights are more in the blue
range, which causes rapid growth (early phase of growth).
Commercial greenhouses use a combination of both HPS & MH at the same time, but
this is very hot and expensive, and not practical for the hobbyist growing in
his home. If a choice must be made, go with a MH light for indoor use, as it has
a wider spectrum of light and is better suited for “all-purpose”.
Now they have available a “conversion lamp”, which permits changing out of the
bulbs, using the same lamp, fixture and ballast. This is what we use, and have
been very happy with.
How much light do you need?
You want a minimum intensity at leaf surfaces of the upper parts of plants of
5500 lux (510 foot candles) for 14-16 hours per day.
HPS bulbs come in 150, 250, 400, 430, 600 and 1000 watts, while MH come 175,
250, 400, 1000 and 1500 watts.
Most vegetable crops and herbs need 30-60 watts of light per square foot of
growing area. Fruiting veggies like tomatoes, peppers and cucumbers light lots
of light, while the leafy veggies like broccoli or cabbage can do with less. The
formula below is the generally accepted rule of thumb for optimum results:
Example: 4 foot X 4 foot garden
4X4= 16 square feet of growing area
16 X 60 watts (high-end light requirement)= 960
(1,000 watts)
16 X 30 watts (low-end veggies)= 480 (400 watts)
That being said, I’m going to bend the rules now. First of all, I gotta tell ya,
1,000 watt lamps are HOT! We almost always use a 4X4 footprint garden of mixed
veggies, and have used 400 watt MH, interchanged with 400 watt HPS, with good
results. But if you want to give yourself the edge, and are heavily into
tomatoes and other fruiting crops, you could get a 600 watt HPS and go with that
exclusively.
P.S. If you have a “double garden” of 4X6 to 4X8 foot, get two 400 or 600 watt
lamps instead of one 1,000+ one.
So have we confused you thoroughly now? Hope not.
How high up?
Start newly transplanted seedlings immediately with the HID light. Start them
out at 3 feet above the plants so you don’t cook them, then lower the light
about a foot a week until it is one foot above the tops of the plants. Now you
reverse the process, raising up about 6 inches as the plants grow 6 inches.
You must use a fan to gently remove the heat out from under the lamp, or it will
kill your plants. Your goal is to keep the temp ideally at 75°, but definitely
below 80° if you can. Air
conditioning is a must in hot climates. A hot lamp on a hot patio spells
disaster. Trust me.
Reflectors & Wall Coverings
The lamp itself will come with a reflector of some sort. Some folks rave about
their “parabolic” or “conical” reflectors, but we can’t comment on them, having
never tried them. We use the boxy “horizontal light reflectors” shown below, and
really doubt there is a whole lot of difference in intensity or performance
in the different reflector shapes.
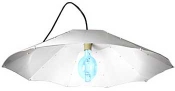 
conical parabolic
horizontal
If your grow room is suitable, you can definitely increase the light reaching
your plants by covering the
walls with reflective Mylar, or white plastic sheeting, which bounces lost light
back to the plants.
So What Is A Light Mover?
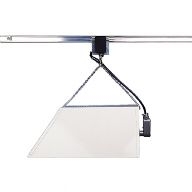
Want a cadillac grow room? Get a light mover. This device moves your lamp back
and forth above the garden for more even light distribution. This promotes more
even growth and prevents burning of leaves. Note: they do not allow you to get
by with less wattage, they just distribute it more evenly.
Linear light movers work on tracks 2-6 feet long, the lamps travel about 2 feet
per minute. These work best for long, narrow growing areas. There are also
circular, revolving movers for more square growing areas.
Light movers are not that expensive but do require a sturdy surface (ceiling
beams or a framework) to mount them on over the garden.
Dear Simon: Growing Vertically?

Dear Simon:
Hi,
Love your site, keep up the important and informative work. Could you please
offer me advice on growing vertically or making a vertical system? I would like
to grow plants or vegetables in 6-10 ” diameter pvc pipes that are vertical. Can
I just drill holes in the sides of these and place grow cups in them?
Thanks for any direction and help!
~ Greg, US
Hi Greg,
Thanks for your kind word about our site, and we are just getting started!
I’ll be honest with you, we have never tried vertical growing systems.
Hydroponics is cool, though, in that you can actually do your own thing, and if
it works, then why not? Experiment with your pipes and see what works. I do know
that when you use pipes and a flowing nutrient kind of setup, it can get a
little tricky. The solution must flow continually over the roots so they don’t
dry out, but not too fast. Also, roots tend to grow and can clog the tubes.
That being said, I know there are plenty of people doing the vertical thing with
pipes, so go for it!
You might be interested in this website, too: http://www.vertigro.com/
Good luck, Greg, and thanks for visiting our site!
Simon
We hope you have enjoyed this issue of The Urban Farmer Ezine. Each month, we will bring you another inspiring photo, gardening quote or idea, plus fresh new hydroponics news, techniques & products.
Insiders tips to get you growing…

~Stella and Simon from Hydroponics-Simplified.
|


Reply