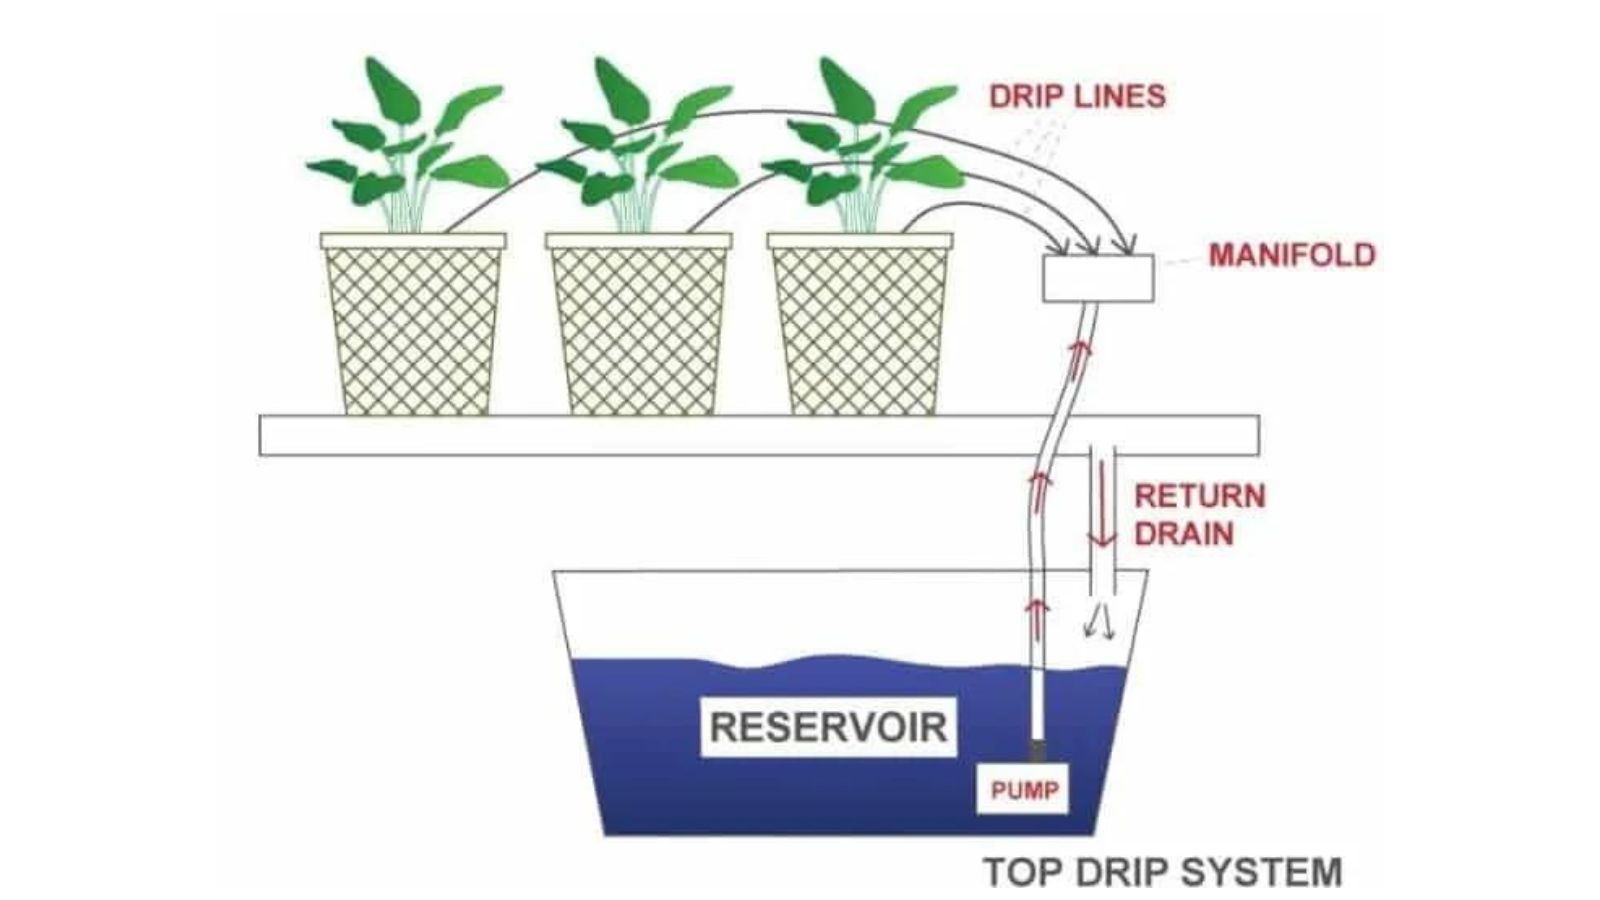
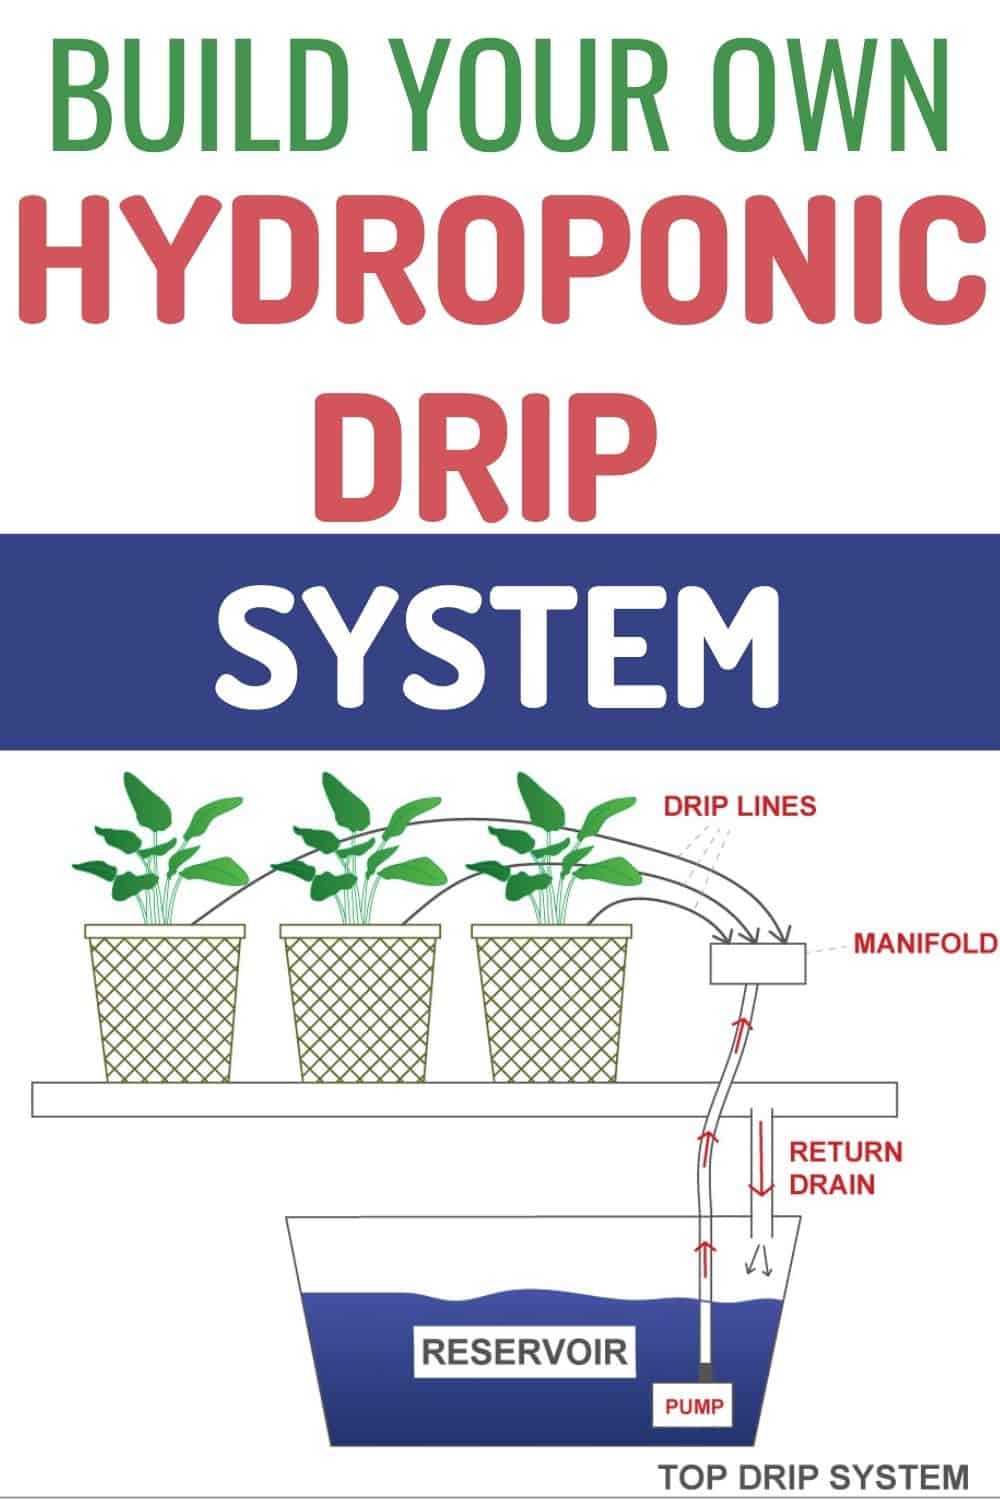
The hydroponic drip system (also called a Dutch bucket hydroponic system) is probably the most common hydroponics system in the world.

How Does The Dutch Bucket Hydroponic System Work
Our Beginner’s Guide To Hydroponics is on sale for a short time. Check it out!
This system is often used in large commercial greenhouses. Once the network of feeder lines is set up, the operation is simple. We like to use the popular Bato® buckets for our top-drip systems, as they are very inexpensive, come with a safety reservoir in the bottom, and are easy to set up on a drainage pipe.
Here’s how it works:
- The nutrient solution is held in a reservoir.
- A pump comes on periodically and pushes the solution through a network of “spaghetti” tubing, which trickles out at the base of each plant.
- The excess drainage out the bottom of the pot is collected and returned to the reservoir, where it is reused for the next “watering”.
- This feeding cycle repeats 2-4 times daily and promotes lush growth.
Dream Big! Learn to build a large hydroponic drip system (4X4 growing bed with 8 or 16 pots!) Read all about it here: Simon’s Simple Hydroponic Plans.
Not ready for a large garden yet? Get started below with free plans for our small top drip mini-farm (3 pots)!
Not into Do-It-Yourself? Perhaps one of these complete kits is perfect for you.
Dutch Bucket Hydroponic Top Drip Systems
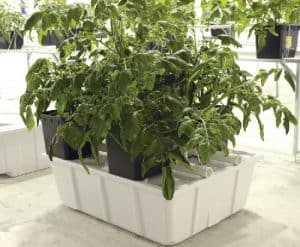 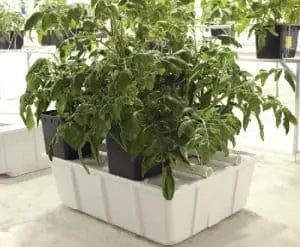 |   |
Create the ideal tomato garden with a Dutch “Bato” bucket-top drip system. We offer automated complete gardens that do all the work for you. Probably the best hydroponic method for growing prized tomatoes.
Build a small top drip system using Bato buckets
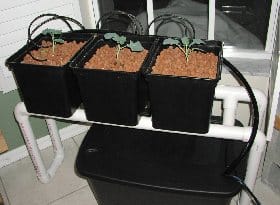
This system is by far the most ambitious of the 5 “mini-farms” we’ve worked with. You must follow the assembly directions carefully and pay attention to details.
Why go to the trouble? We have found that our top drip systems have produced the lushest and most prolific plant growth of all. Also, once it’s built, it’s pretty low-maintenance.
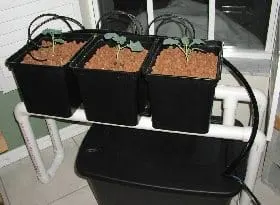
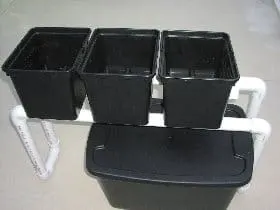
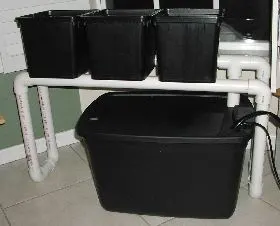
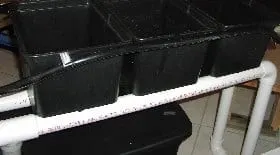
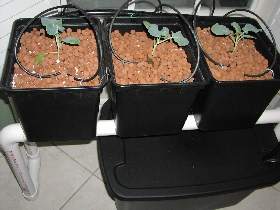
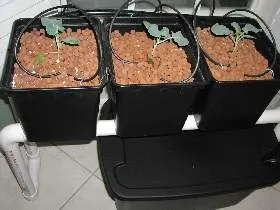
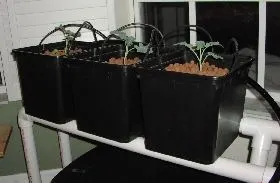
We have designed a small hydroponic drip system that supports 3 large grow pots (Dutch Bato Buckets). We love Bato buckets because they are inexpensive and have a built-in safety feature.
A small reserve of nutrient solution is always held at the bottom of each pot. In the event of a power failure, the plants will not die but can live off the reserve for a couple of days.
Top drip Batos form a great, dependable hydroponic unit. This garden cost about $150 (not including a lamp and food). Most of the materials are available from Home Depot or Walmart. A few items must come from a hydroponics supplier (but we give you a good cheap source).
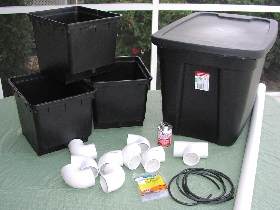
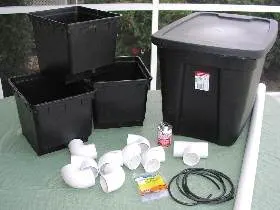
Supply list:
- Rubbermaid black storage tote bin with lid – 18 gallons. Find it at Home Depot, or buy it from Amazon
- 3 Bato Dutch buckets
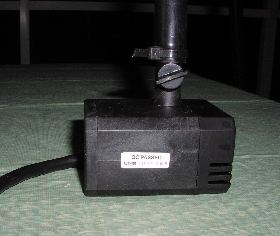
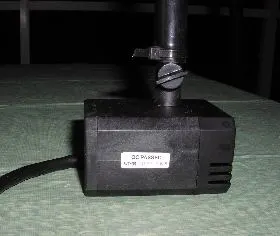
- small submersible pond pump – 120 gph
- mechanical garden timer (15-minute increments) [Walmart]
- aquarium air pump, 6 feet of airline tubing, “T” connector & 5” airstone [Walmart]
- PVC pieces: 1½” schedule 40 PVC pipe, two 10 foot pieces of pipe, 8 elbows, 1 “t” piece
- one 4 oz. can of PVC cement (gold label) [Home Depot] Don’t get blue glue.
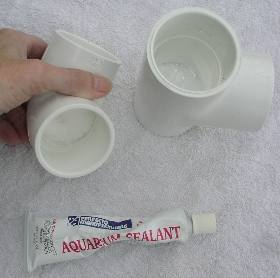
- small tube aquarium grade silicone sealant [Pet shop]
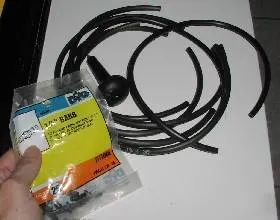
- black irrigation tubing, ½ “ I.D. (inner diameter) about 6 feet long [Home Depot]
- 1/4” irrigation “spaghetti” tubing, 10 feet (for drip lines) [Home Depot]
- six 1/4” irrigation barb connectors (smallest bag) [Home Depot]
- small bag of perlite [Home Depot]
- one brick of coco coir & a small bag of LECA (Hydroton or clay balls).
- Rubbermaid black storage tote bin with lid – 18 gallons. Find it at Home Depot, or buy it from Amazon
- 3 Bato Dutch buckets
Tools needed:
- Power drill: 1-3/4” or 1-7/8” & 2-1/4” hole saw drills & 7/8” and 1” spade drill bits (Borrow a hole saw kit or buy one; you will definitely use it again).
- Hacksaw, PVC pipe cutter, or power saw to cut the PVC pipe.
The heart of the Bato bucket is the built-in safety “reservoir” for a nutrient solution that rests at the bottom of the pot. The bucket has a “cutout,” allowing it to sit on 1-½” PVC pipe, into which you drill some drainage holes.
A special port that comes with the bucket allows excess drainage to leave the pot via these drainage pipes. (This will all make more sense to you during the unit assembly.)
Cutting and building the PVC stand
Please follow the instructions carefully in the order suggested. Surely, we don’t need to remind you to use safety goggles and take care when cutting.
And never forget: alcohol and power tools do not mix. Trust me, I know!
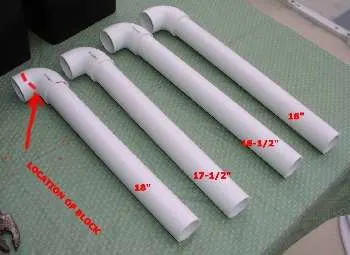
1. Cut pieces of the 1½” schedule 40 PVC pipe to the following lengths. Lightly file or sand the cut edges to remove burrs:
- 1 pc 31″ long
- 1 pc 35-¼” long
- 1 pc 18″ long
- 1 pc 17-½” long
- 1 pc 16-½” long
- 1 pc 16″ long
- 2 pcs. 5″ long
- 1 pc. 6″ long
- 1 pc 2″ long
2. Assemble and glue up the back drain pipe. You will apply a nice coat of glue to each PVC piece before pushing them together. Once you attach them together, you have only 5 seconds to get it seated properly before a permanent and unbreakable bond is set.
If you screw it up, throw it in the trash and start over. (so… you might want to buy a couple of extra elbows and a t-piece to be on the safe side: you can always return them if you don’t need them).
You are going to assemble and glue up the back drain pipe first. This is by far the trickiest part of the whole operation. Listen carefully to avoid a trip back to Home Depot.
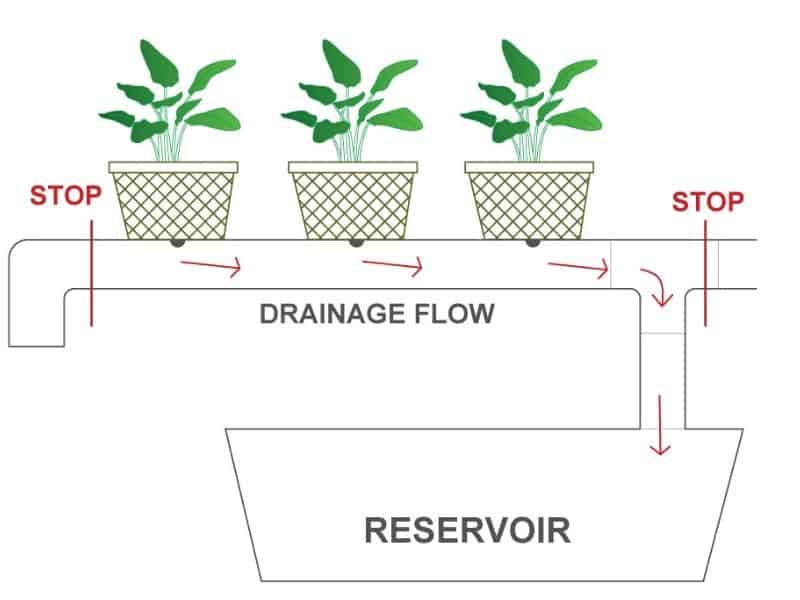
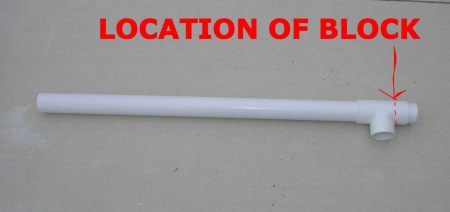
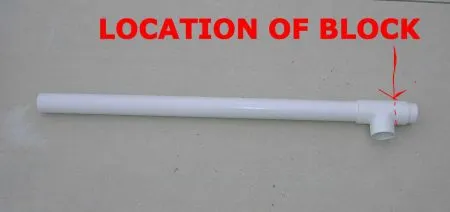
To form the back drain rail, you will need the 31″ pipe, the 2″ pipe, and the “T” piece. This pipe is what will collect the drainage from your pots, so it needs to be sealed off on both ends so the fluids won’t run down into the legs of your stand. (This will also make more sense to you once you start putting things together).
First, study the drawing below. Do you see how you need to block off the inside of the tube at the elbow and “t” piece (at the RED STOPS), so there is only one small restricted chamber for fluid drainage?
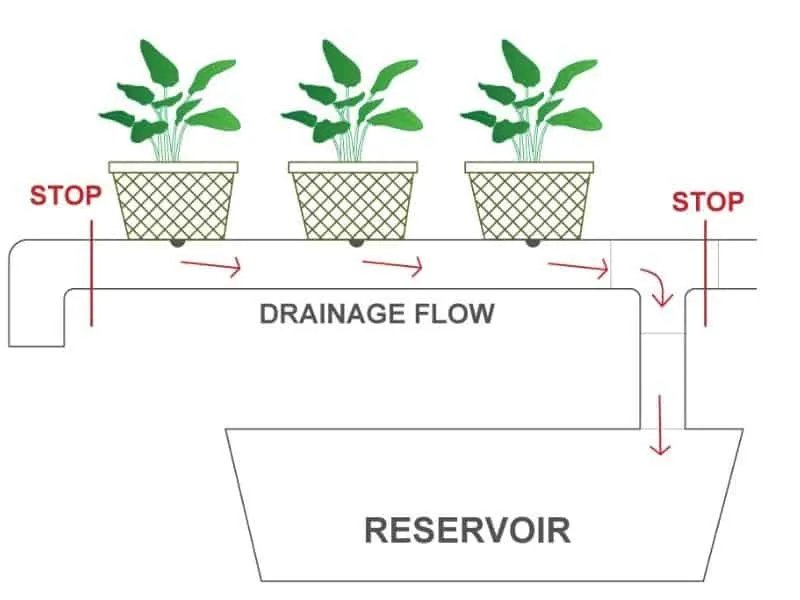
TIP: Do not use household silicone: it has chemicals you don’t want to feed your plants.
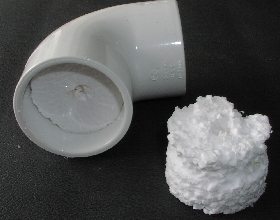
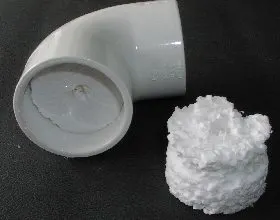
So, you will need to insert a waterproof “block” at the elbow on the left and the outside port of the “T” piece. You can use whatever inert (plastic) material you can find and seal it off with aquarium grade silicone sealant.
We blocked ours off with 2″ wide Styrofoam circles cut from building insulation. You could cut 2″ circles from an old Styrofoam ice chest or whatever works!
3. Next, push one styro block into one elbow piece and do the same for one end of the “T” piece. Push in far enough to leave enough room for the straight pipe to fit in later.
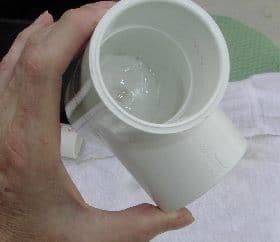
Apply a thick coat of silicone sealant on top of the block and around the sides of it. Allow it to set up, then apply a second coat. The idea is you want it totally blocked off so no moisture can get through.
Tip: do not use PVC cement for this. It melts the Styrofoam. You can trust me on this one!
  |   |
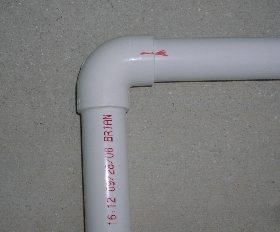
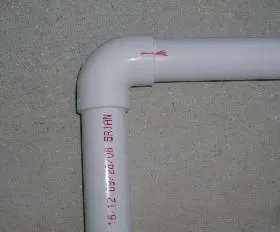
4. It’s time to glue up the back rail. For this, use the 31″ & 2″ pieces of straight pipe and the “T” piece with the “block” glued in one side. Do not put the elbows on at this time. Make sure you put the T-piece on with the “block side” towards the outside, the 2″ piece. This is how it should be assembled:
Glue up the stand
How to use PVC glue: apply to both pieces, then push them together all the way in. Hold jammed all the way together for about 5 seconds to set the glue. It is now permanently bonded.
Pencil a “line-up” mark on each piece so you’ll know instantly where to push together. If you goof, start over.
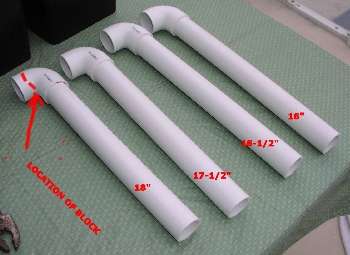
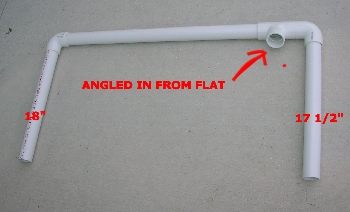
5. Next, glue the elbow with the “block”: glue it to the 18″ cut piece, and glue the leg into the end without the block. Glue 3 other elbows to the other leg pieces (17-½”, 16-½” & 16″ cut pieces). This is how it should look:
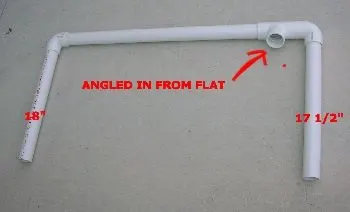
6. Now glue the two longer legs to the back (drain) rail (the assembly with the T piece glued in). The 18″ pc (with the block glued in the elbow) goes on the plain end of the rail. The 17 1/2″ leg goes on the T-pc end of the rail. First, you will do a dry run. The legs need to be flat (& parallel), but the t-piece will angle in to drain into the reservoir. This is what you are attempting to do:
7. First assemble as a dry run, ensuring the legs lie flat, with the T pc angled in slightly. Use a marker to show where the pieces line up before gluing them home. Push flat on the floor as you glue it together so it is perfectly FLAT.
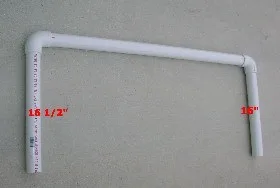
8. Next,, glue the two shorter legs to the front rail using the 35-¼”, 16-½”, & 16″ pieces. Do a dry run first, lay the assembly flat on the floor, and mark where the pipe goes into the elbows like below. Then, glue them on. Push it flat on the floor as you glue it together so it is FLAT.
  |   |
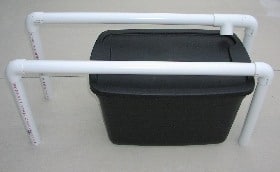
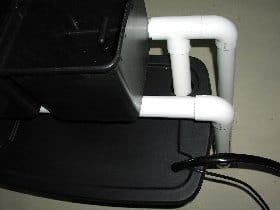
9. Next, add the two 5” pieces to the bottoms of the legs. Glue one elbow on each end of each of the 5″ cut pieces, making sure to seat them all the way in for each joint. Then, glue to the bottom end of the two assembled frames. The two taller legs (18″ and 16-½”) go to one “U,” and the two shorter legs (17 ½” and 16″) go to the other “U.” This is what it looks like all glued up:
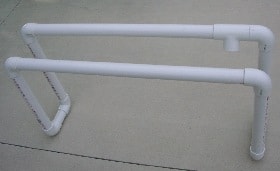
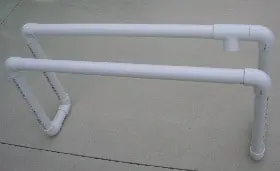
Setting up the buckets for the top drip Bato buckets a system
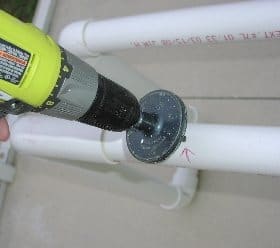
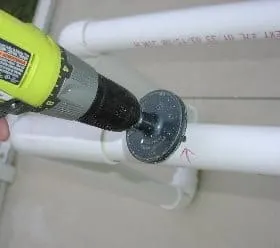
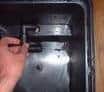
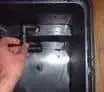
10. Now, it’s time to drill the drain holes in the back drainage rail (the one with the t-piece). Set the three Batos onto the frame so they line up evenly between the elbow and the T-piece, and mark on the PVC pipe where the drain holes come out:
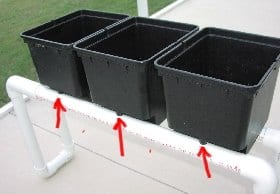
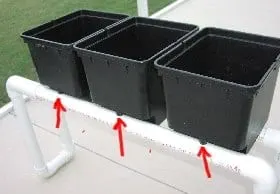
11. Drill the three holes in the very top of the PVC pipe Using the 7/8” spade bit or a 1” hole saw bit. This is where the Bato drain elbows will fit into the drain pipe.
  | 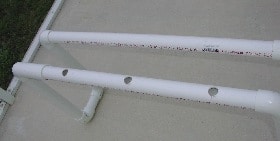 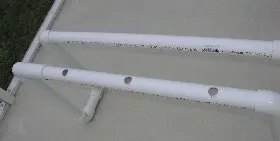 |
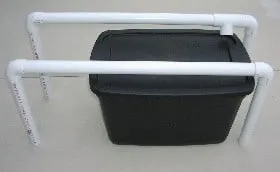
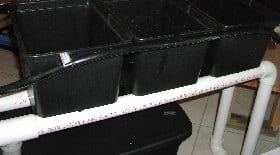
12. You’re really getting there now. This is what it looks like with buckets in place:

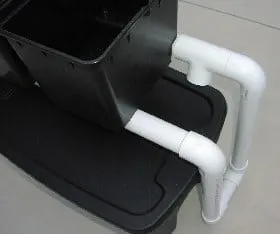
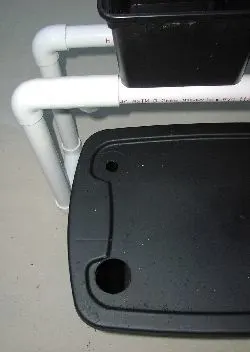
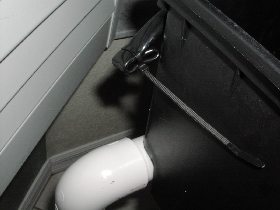
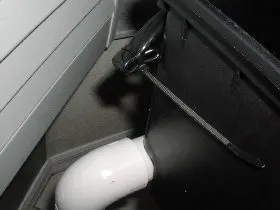
13. The remaining 6″ piece of PVC pipe is the drain pipe extension. Glue it into the down port of the T-piece. Then, using the 2-¼” hole saw, cut a hole in the reservoir lid right where the drain port extension hits the lid so that it will enter it. Cut a smaller 1″ hole in the front corner as shown. This is where the hose will come up from the pump to the feeder lines.
  |   |
About Bato (Dutch) Buckets
Dutch buckets are a fantastic complement to the highly efficient drip irrigation systems. The bucket has a unique patented internal drainage system. The two elbows included with the unit suck overflow water from the lowest level of the bucket and discharge it into a central drainpipe.
By doing this, the older, more stagnant nutrients are removed from the bottom of the container, allowing the fresher mix to flow from the top.
- Central drainpipe: 1-1/2 inch PVC pipe
- Bucket measurements: 12″ long, 10″ wide, 9″ tall
- Plastics: Food grade polypropylene
- Growing media: clay balls, perlite, coco coir
Installing the pump to the top feed drip system
14. Push one end of the 6 foot ½ inch irrigation tubing onto the outlet port of the pond pump. If it fits too loose, you must secure it with a zip tie so it doesn’t come off during assembly and operation.
First, push the pump electrical plug up through the bottom of the reservoir lid, then the ½” irrigation tubing through the same hole. See photos below.
  | 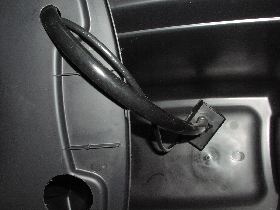 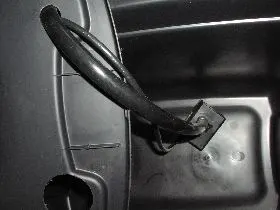 |   |
15. Now set the frame up where you want your garden to reside permanently. Assemble the two black elbow pieces that come with each Bato bucket so it forms a “U”. Then push it forcefully over the drain hole in the bottom of the bucket, until it snaps down completely and the barbs exit the bottom hole. This takes some force.
Make sure the barbs go through completely or the bucket will not drain properly. (Can’t stress this point too much, took me a while to figure this one out). Now put the buckets in place, with the drain elbows extending down into the drain holes you drilled into the PVC pipe.

About top-drip irrigation
Drip irrigation has long been used in the outdoor landscape, due to its highly effective but water-conserving means of keeping even moisture around the plant roots.
Top drip hydroponics systems realize high production of crops for the same reason. Nutrients trickled over the surface of the media right at the root zone bathe those roots continually in “grow juice”.
The result? Amazingly rapid growth with high flowering/fruit production. Due to the recycling and reuse of the nutrients via a drain and reservoir set up, there is virtually no waste of water and nutrients.
Top feed hydroponics is one of the most popular, prolific, and earth-friendly methods you could adopt. Get started today with these simple plans.
Top feed spaghetti feeder line
16. Now to make the “spaghetti” feeder lines. The large 1/2″ tubing that comes up from the pump in the reservoir: arrange it so that it runs at the back top edge of the 3 buckets, and tape in place temporarily.
17. Cut the end of the tube off about 6 inches beyond the third bucket, roll it over 3 times and seal it off with a zip tie. This is the end of “the run”, and you don’t want it leaking.
18. Mark off 2 spots on this tube at each bucket. This is where the spaghetti lines will run off the larger main tube to the plants. Each bucket gets two feeder lines.

19. Now get the small 1/4″ spaghetti tubing and the barbed connectors ready. Cut six 16″ pieces of the tubing for the feeder lines. Take your time and work each tubing piece onto one end of a 1/4″ barbed connector. It will take some time to force it down flush. And I mean all the way. Seat it properly now and it won’t leak later.
20. Now you want to attach the spaghetti lines to the larger feeder tube where you marked the six spots. You must punch a tiny hole at each of those six spots where you marked them off.
We use a hole punch made just for the job. It only costs a couple of bucks in the irrigation section at Home Depot.
22. You can just lay the tubing on top of the pot surface or secure it in some way. We used little metal plant clips we found in the Walmart garden center.
Note: They sell dripper valves that go on the ends of the spaghetti tubing, but these always get clogged. Save yourself the money and headache and just let them be. The nutrient solution trickles out the end of the tubes at the base of the plant. No problem.

Hydroponics Simplified 🙂
How to put the hydroponic Dutch bucket system together
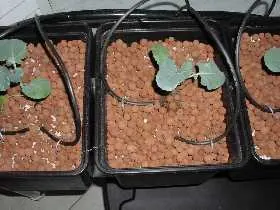
23. After fully installing the drain elbows in the bottom of the pots, fill them up with a 50/50 mix of Coco coir and perlite. Then place a 1″ layer of LECA or clay balls on the top.
The balls help keep the medium from being disturbed during the feeding cycle and also keeps algae from growing on the top.
24. Plant your seedlings or baby plants (not seeds), and install the drip lines on top. This is what it looks like:
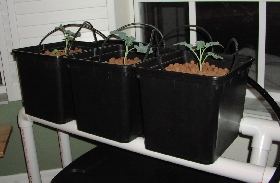
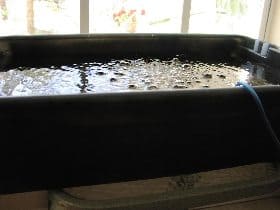
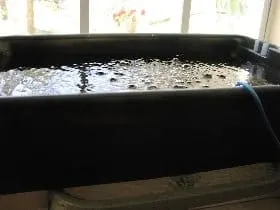
25. Fill the black bin (reservoir) with 10 gallons of water. Plug in the water pump and test for operation and leaks. Seal up any leaks with the aquarium silicone sealant and allow to cure.
Add a nutrient concentrate of choice. If you are using GH Flora Series (recommended), add 10 tsp. each of the Flora Grow, Flora Micro & Flora Bloom (one at a time, in that order). Adjust the pH of the solution with a test kit.
26. Plug the water pump into the timer and set it to feed 3 times a day for only 15 minutes each feed cycle. (6 am, noon, and 6 pm are good). Let them rest through the night: no feeding, just like people.
TIP: The air pump must be placed higher than the reservoir to prevent the backflow of the solution into the pump.
27. Aeration: Place the bubbler airstone in the bottom of the reservoir, run the airline tubing up where the pump tubing is, and attach it to the air pump. The bubbler stays on 24/7. This oxygenates and aerates the nutrient solution,
However, you might want to go to a pet shop and buy an upgraded air pump for the stone. We bought this one for $20, and it is super quiet! Also, look for a circular airstone.
")
Drip hydroponics system final thoughts
We hope you will try out our plans for this cool little top drip system. You will be amazed at the scope and amount of produce you can reap from this unit. It provides a great introduction to hydroponics for adults and children alike, and it’s just plain FUN.
Our guess is that once you get a taste of hydro in this way, you will go on to bigger and better things. This field of horticulture is wide open! There are many different methods for you to try, and you’ll just get more knowledgeable and skilled at it as time goes on.
You might try growing heirloom tomatoes, herbs, or even orchids. Or you might just enjoy munching on your own healthy, homegrown salad micro-greens! No matter which way your interests take you, you are sure to enjoy this clean, healthy, prolific, earth-friendly gardening method. We just love hydroponics and know you will too.
Explore our hydroponic gardening category often for updates on equipment, lighting, nutrition, plants and seeds, pests, grow-closets, and plans for several other different growing systems. We provide simple information, insider secrets, and easy-to-follow instructions to get you up and growing in no time.


Stella and Simon, a couple of back-to-the-land, baby boomer enthusiasts, have embraced the world of homemade hydroponics on their three-acre plot of Florida piney woods. Their journey began after drawing inspiration from Epcot Center’s hydroponics exhibit, and they've delved into various hydroponic methods, experimenting with different systems, configurations, and crops both indoors and outdoors. Their expertise culminated in the creation of an innovative homemade hydroponics greenhouse, documented in their book, Simon’s Super Simple On-the-Grid, Off-the-Grid Hydroponic/Aquaponic Survival Greenhouse.
Free Plans For Hydroponic Setups
Thursday 14th of October 2021
[…] Top drip Dutch Bato buckets are most effective for the larger crops as listed above. However, you can put multiple smaller plants into one bucket, like four heads of romaine lettuce. Once these are set up, they are easy to use and quite prolific. […]
Complete Hydroponic Kits For Growing Vegetables Indoors
Thursday 14th of October 2021
[…] The perfect top drip system with classic Bato buckets. […]