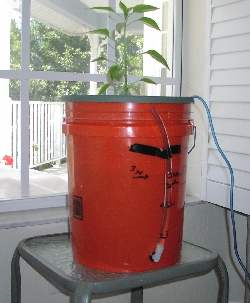
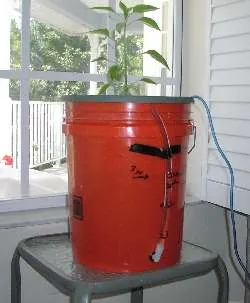
Bucket hydroponics are super easy… and they give great results! If you want to grow just one or two large plants, then bucket hydroponics or the “Bucket Bubbler” is for you! A bucket hydroponic setup is very popular for growing a few large specimens in small spaces. They are simple and cheap to build, low maintenance and the plants love them.

The bubbler bucket is a combination of aeroponics/deep water culture systems, and we have gotten some very impressive results from it. I always keep one growing in my office, as I love the soothing “water sounds”.
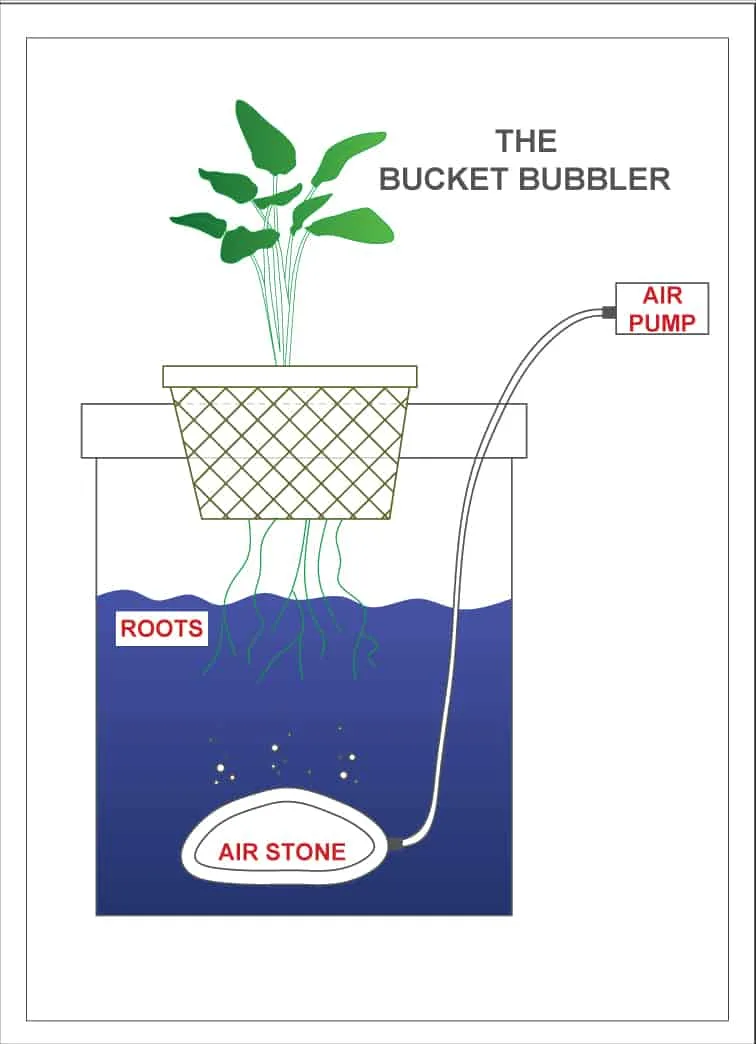
How Do Bucket Hydroponics Work?
 The plant sits in a net pot (or grow pot) with lots of drainage holes in it, which is suspended over a bucket of aerated nutrient solution.
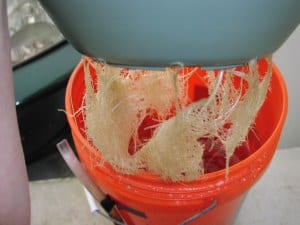
The roots grow through the drainage holes, reaching into the solution below. It eventually forms a large “root ball” at the bottom of the bucket.
Interested in a larger, 6-plant, 18-gallon Hydro bubbler system? Get the plans in our Grow Box E-book, or find instructions for an open-air bubbler system here: The Hydro Bubbler.
Not ready for a large hydroponic garden yet? Get started below with our single and simple bucket bubbler FREE PLANS.
How To Build A Bucket Bubbler System
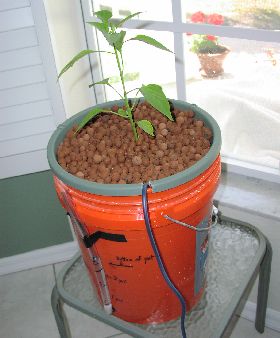
 These work great for one or two large “specimen plants”. They can support a slow-growing plant like a fig for the long-term.
There is plenty of room in the 5-gallon bucket for a large root mass, which means a large plant will thrive in it.
Bucket bubblers are super easy to construct and get growing, and they are too cool! I love them and keep one going at all times in my office.
Most of the needed materials are available from Home Depot or the hardware store. A couple of items must come from a hydroponics supplier (but we tell you a good source).
1: Supply list for making your own bucket bubbler:
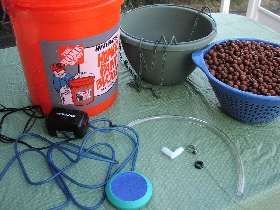
 5 gallon “Homer” bucket [Home Depot]
- Flowerpot that flares out at the top and fits on top of the open bucket. It must have some depth to it. We used a hanging pot, and just took off the metal hanging hoop. It is 12” across the top, 6” across the bottom, and 7” deep. It fits perfectly in the homer bucket, yet has plenty of room. [Home Depot]
- Aquarium air pump, 6 feet of airline tubing, “T” connector & 5” airstone [Walmart]
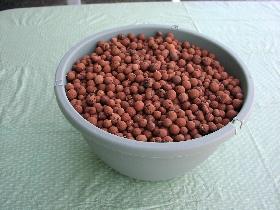
- Bag of LECA (Hydroton or clay balls) More on this and ordering info later in the tips and techniques section.
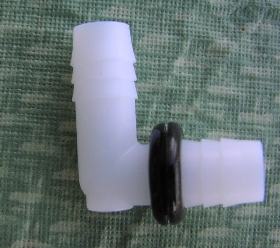
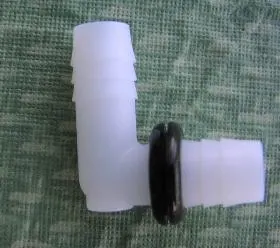
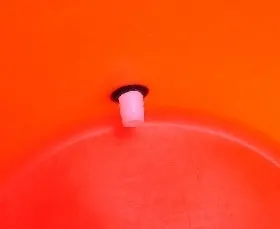
- 1/2” I.D. (inner diameter) grommet; see photo part 2 [Home Depot electrical section or hardware store]
- 1/2” O.D. (outer diameter) barbed elbow piece; see photo part 2 [Hardware store]
- Clear 1/2” I.D. flexible tubing; 14” long [Home Depot or hardware store]
Tools needed:
- Power drill
- 3/4” & 3/8” regular or spade drill bits
2: Prepare the bucket
The grommet and elbow fixture is really the only “tricky” part of this project. This elbow will extend into the bottom of the bucket as a port for a water level indicator tube.
It is important that it be leakproof while still allowing the elbow to turn in the grommet. This will make more sense later. Just follow the directions exactly and you will end up with a leak-proof joint.
 |
  |
Here’s how to build hydroponic bucket systems:
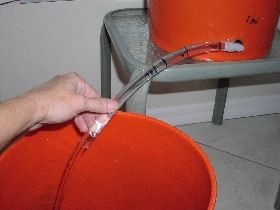
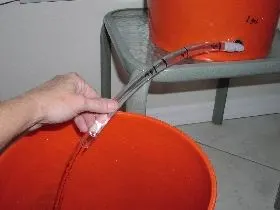
First, you want to install the clear tube indicator on the side of the bucket. This tube does two things:
- Fluid level indicator – know the nutrient level without lifting up the plant to look inside.
- Drain port – so you can easily empty out the solution without disturbing the plant. It works by swiveling at the elbow so you can empty it into a drain bucket.
Don’t like “Homer Orange”? Spray paint the outside of the bucket with a more desirable color. Do not get paint on the inside of the bucket.
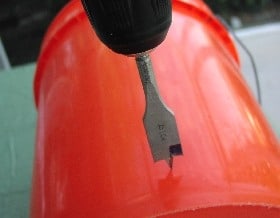
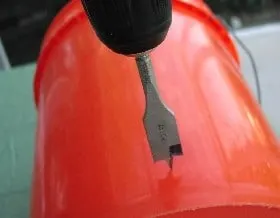
1. Use the power drill to drill a 3/4” hole in the side of the bucket about 1” up from the bottom. Go slowly and carefully, holding the drill very securely. Hold on tight, spade drills can get away from you. You don’t want to create a hole any larger than the 3/4” drill bit, or it won’t be watertight later. Smooth the inside and outside of the hole lightly with sandpaper to remove any burrs or debris.
  |
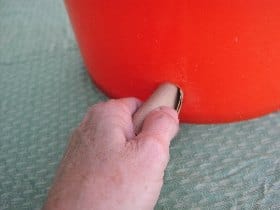  |
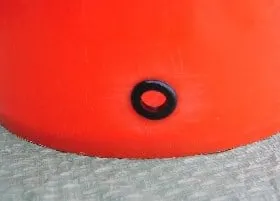
2. Insert the grommet into the hole. Work carefully and seat it so it flares out on the inside and the outside of the bucket. It will fit a little loose at this point. The insertion of the elbow piece later will tighten up the seal.

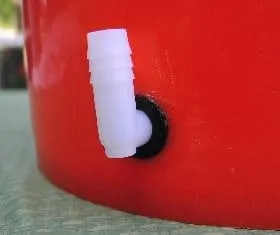
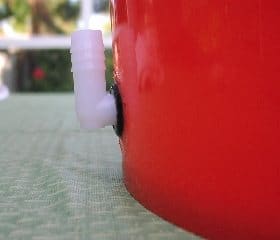
3. Carefully work the barbed elbow piece into the gasket. It helps to lubricate it with a tiny bit of liquid soap to ease insertion. Take your time and use a little bit of force to seat it properly. You don’t want to push the grommet thru and have to start all over.
Once the elbow is in, make sure the grommet is even all the way around, inside and outside the bucket. See photos below.
  |
  |
  |
4. At this point, you can add extra insurance against leakage by adding a bead of silicone around the grommet. We did not do this and still had a leak-proof joint. But if you test your system and find it does leak around the grommet, go to a pet shop and buy aquarium grade silicone sealant (do not use household silicone caulk, as it has chemicals in it that will leach into the nutrient solution).
Seal the grommet with a small bead of caulk around the outer edges ONLY. You will have to use your finger to smooth it. You want to seal the black grommet to the orange bucket, but you do not want to glue the white elbow port to the black grommet. It is essential that the elbow is able to turn freely in the grommet.

 5. After the silicone has cured thoroughly, push the 1/2” clear tubing down over the outside port of the barbed elbow. If it doesn’t fit tightly, clamp it in place on the elbow piece with a small 1/4” hose clamp (hardware store). Loosely tape the tubing upright against the side of the bucket.
3: Prepare the planting pot
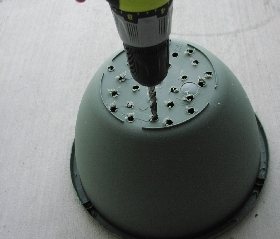
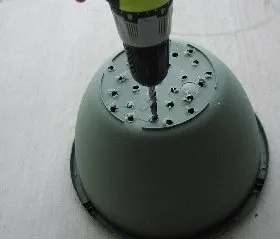
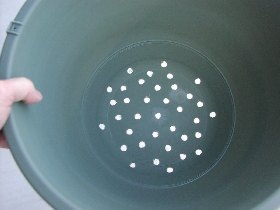
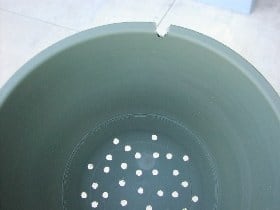
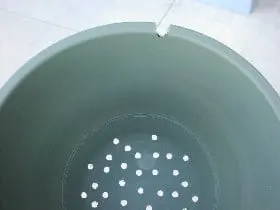
6. Now get the planting pot ready. Drill several 1/4” or 3/8” holes in the bottom and lower sides of the pot. Use care with this or you will bust out the bottom of the pot and have to go back to Home Depot (I hate when that happens). Clean up the holes with a razor knife to remove burrs.
  |
  |
7. Cut a small “V” in the top lip of the pot for the airline tubing to pass through. Use a hacksaw or razor knife to cut this.
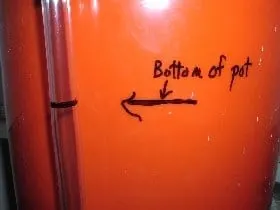
8. Mark the orange bucket at the level of the bottom of the flower pot when it is seated on top. You can do this by measuring down with a ruler and marking the level with a permanent marker. Mark this level on the side of the bucket and on the clear indicator tubing. With my pot, it was 7” down from the top of the bucket.

9. Set the bucket up off the floor on a sturdy table or other support; (its final resting place). You need to have it elevated so you can drain the solution from it easily.
Start adding water one gallon at a time. Check for leaks at the elbow. Stop after adding each measured gallon and mark that on the clear level indicator tube, so you will have the volume indicated once the bucket is set up.
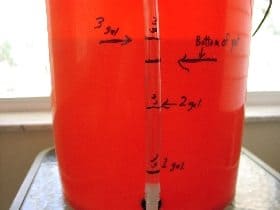
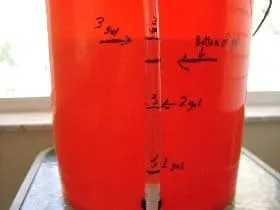
10. Stop adding water when the level reaches an inch above the “bottom of pot” mark. In my case, this took 3 gallons of water.
4: Make some bubbles!
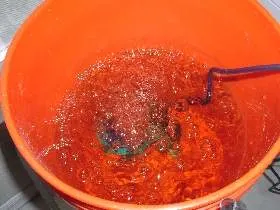
11. Drop in the airstone bubbler, connect to the air pump, and plug it in to test for a good rolling boil of bubbles. The bubbler with airstone stays on 24/7. This aerates the nutrient solution, keeping it from becoming stagnant, and oxygenates the root mass which will form in the bucket.

Earlier we listed the cheapest supplies we could find, to help keep the cost of this setup low. However, you might want to go to a pet shop and buy an upgrade air pump for the stone.
Also, look for a circular airstone. This air pump has two outlet ports. If you wanted to run two bubble buckets off one air pump, run a line off each port to the two different airstones. If you only want one bucket, then buy a “T” adapter and tie in both ports to one airstone. No use wasting half those precious bubbles!
12. Next, add a nutrient concentrate of choice, for 3 gallons of water. If you are using GH Flora Series (recommended), add 3 tsp. each of the Flora Grow, Flora Micro & Flora Bloom, (one at a time, in that order). Adjust the pH of the solution with a test kit (more on this, and ordering info, later).
Why the bubble reservoir?
Two reasons:
- Without aeration and movement (bubble action), water tends to stagnate and brew undesirable bacteria called anaerobes. These harmful bugs cause mold, root rot, and other nasty plant diseases if left unchecked. The one best method of combating anaerobic infestation is to infuse the water with a healthy dose of oxygen, which an air stone and pump do very well. Anaerobes can only thrive in the absence of oxygen. So bubbling up your reservoir directly prevents anaerobic bacteria from taking root. TIP: Add a teaspoon per gallon of hydrogen peroxide solution to your reservoir during the change-out of nutrients to further combat these harmful invaders.
- Bubbles of air released into the nutrient solution turn the reservoir chamber into an “aeroponic zone”, with high humidity and life-giving nutrients delivered right to the plant’s roots. This promotes a robust, thriving root system; and hence a healthy plant up top. TIP: Keeping the nutrient solution cool (preferably 70 to 75°F) also keeps plants comfortable and retards bacterial growth.
5: Time to Plant
13. Time to plant! Fill the flower pot with well-rinsed LECA (Hydroton or clay balls). Dig a hole in the center and carefully place the seedling (in
its grow cube) into the pot. Firm up the balls a little around the plant to provide good support.
  |
 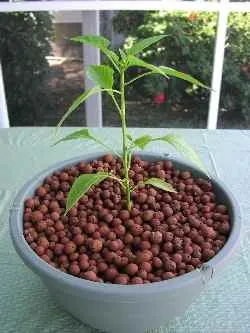 |
14. Plug it in and watch it grow!
15. Note: We kept these plans simple and cheap. Some bubbler designs include a top drip mechanism; this is not really necessary after the first couple of weeks.
With our unit, you’ll have to “top water” your plant with nutrient solution, twice daily for the first week or two. A turkey baster works great for this.
After 7-10 days, carefully lift the pot up to see if roots are dangling out the bottom of the pot. Depending on the type of plant, this can take up to 3 weeks!
When it gets a good root “beard” of 2-3”, drain out a couple of inches of nutrient solution. Once the roots have emerged, they need a buffer of air between them and the fluids. You do not want the roots totally submerged. Lowering the solution level provides this “breathing space”.
16. As the nutrient level drops in the bucket due to plant uptake and evaporation, keep topping it up with ONLY plain water, not nutrient solution, keeping track of how much you add each time. How do you add fluid to the bucket? Carefully pour it straight over the leca balls, and it will trickle through.
When you have added a total of 1½ gallons (6 quarts) of plain water, stop topping it up at that point and let the level drop down to the 1-gallon level. At this point, it is time to drain the solution out and mix up a fresh 2-gallon batch. This is known as the “50% method” and works well for us.
17. This is how you drain out the bucket: Untape the clear tubing and carefully turn the clear tube downward into another drain bucket… and voila…now ain’t that cool?
6: Tips and techniques
Lighting
You can use just the light from a sunny window if all you are growing are houseplants. Anything else requires some supplemental lighting. A T5
compact fluorescent “grow light” will do fine for houseplants, herbs, and leafy green veggies like lettuce.

TIP – The grow room must be kept cool. Use a fan on low in there to cool it down. HID lamps will really add some heat.
If you are interested in fruiting veggies like tomatoes, or serious herbs, you will have to upgrade to an HID lamp. Learn more about HID lighting
and see our special combo lamp deal here: hydroponic lights.
Nutrients
We highly recommend the Flora Series nutrient solutions put out by GH (General Hydroponics). This stuff is superior, easy to use, and reasonably priced. It consists of 3 parts (Flora Grow; Flora Micro; and Flora Bloom). If you have hard water, get the Hardwater Flora Micro instead.
For this bucket setup, order a quart of each of the three solutions. Stick with Flora Series, follow the label directions, and you can’t go wrong!
") The nutrient solution must be kept cool (55-70°). This is especially important for cool-season crops like lettuce and broccoli.
The nutrient solution must be kept cool (55-70°). This is especially important for cool-season crops like lettuce and broccoli.
As the nutrient level drops in the bucket, you need to periodically add water only (not more nutrients). Keep track of how much you top up with.
When you have replaced 6 quarts of water, stop topping up and let the level drop down to between 1-2 gallons.
Then it is time to drain the bucket and mix up a new batch of nutrient solution. Each new 2-3 gallon batch should last 3-4 weeks by following this “50% system”.
pH-
It is a very good idea for any serious hydroponics project to keep the pH of the water in the proper range, which is 5.5 to 6.5 (6.0 is ideal). If the pH is out of range, some of the nutrients get “locked out” and the plants suffer.
GH puts out a simple test kit with pH up & down solutions cheaply. It will last you through many gardens.

Growing media
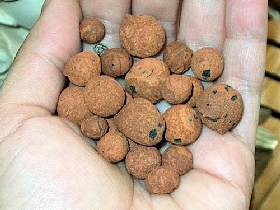

The only growing medium we recommend for the hydroponics bubbler system is LECA (also called Hydroton or clay balls). Other traditional media will just drop down through the holes.
LECA provides an excellent moisture wick as well as good support for the plant.

7: Final Thoughts
We hope you will try out our plans for this cool bucket bubbler system. You will be amazed at the size and health of your specimen plant in this unit. It provides a great introduction to hydroponics for adults and children alike, and it’s just plain FUN.
Our guess is that once you get a taste of hydro in this way, you will go on to bigger and better things. This field of horticulture is wide open! There are many different methods for you to try, and you’ll just get more knowledgeable and skilled at it as time goes on.
You might try growing heirloom tomatoes, herbs, or even orchids. Or you might just enjoy munching on your own healthy, homegrown salad
micro-greens!
No matter which way your interests take you, you are sure to enjoy this clean, healthy, prolific, earth-friendly gardening method. We just love hydroponics and know you will too.
Adriana Copaceanu is a passionate nature lover living in the country on her dream property where she grows vegetables, lavender, and wildflowers that she shares with the wildlife they attract. When she's not in the garden, she loves spending time with her chickens and planning her next nature project. Check out her books below:
How to Grow Lavender for Fun and Profit: Lessons Learned from Planting Three Hundred Lavender Plants
Free Plans For Hydroponic Setups
Thursday 14th of October 2021
[…] bucket bubbler (single pot plants) […]
How To Propagate Plants From Cuttings - Easy & Rewarding!
Thursday 11th of February 2021
[…] TIP: Keep the source plant (Momma) by itself in a bucket bubbler unit for 6-9 months before replacing it with a fresh mother plant. Click here for free bubbler plans. […]